All in One View
Content from Introduction to CERN GitLab CI/CD
Last updated on 2025-12-20 | Edit this page
Overview
Questions
- What is GitLab CI and why should I use it?
- How does a GitLab pipeline work in practice?
Objectives
- Understand the purpose and benefits of using GitLab CI/CD.
- Be able to create and explain a simple
.gitlab-ci.ymlfile for automating tasks.
Before getting into details, a few links to useful documentation on GitLab CI/CD and also CERN-specific information:
These pages serve as a good entrypoint in case of problems and questions.
If you haven’t follow the setup instructions to add your SSH key to your CERN GitLab account, please do so before continuing with this lesson.
If you are familiar with Gitlab CI/CD, you can skip ahead to the next lesson.
Why Use GitLab CI/CD?
GitLab CI/CD (Continuous Integration/Continuous Deployment) helps you automate tasks like testing, building, or deploying your code every time you make changes. This ensures your code is always working, your results are reliable, and saves you time from catching errors and doing repetitive tasks manually.
GitLab CI/CD is especially useful in collaborative projects, where multiple people contribute code. It helps maintain code quality and consistency across the team.
How Does It Work?
The set of steps and instructions (pipeline) is
defined in a file called .gitlab-ci.yml in your repository.
This file specifies what tasks to run, when to run them, and how to run
them. When you push code, GitLab reads this file and runs the jobs as
described.
What is a GitLab Pipeline?
A pipeline is a sequence of jobs that run automatically when you push changes to your repository. Each job performs a specific task, such as checking your code or building your project.
Key concepts:
- Job: A single task (e.g., run analyzer, create container, check cutflow).
- Stage: A group of jobs that run in order (e.g., test, build, deploy).
- Pipeline: The full set of stages and jobs, triggered by changes to your code.
Example 1: The Simplest GitLab CI Pipeline
Let’s start with the most basic pipeline. This example just prints a message to show that the pipeline is working.
Create a file called .gitlab-ci.yml in your project
folder with the following content:
Now, push this file to your GitLab repository.
Create the
.gitlab-ci.ymlfile as above.-
Add, commit, and push it to your repository:
Go to your project’s Build > Pipelines page on GitLab to see it run!
What happens if you follow these instructions?
If you go to the Gitlab website, and to your project’s Build > Pipelines page, you will see a new pipeline has been created and is running. Once it finishes, you can click on the job to see the logs, which will show the message “Hello from GitLab CI!”.
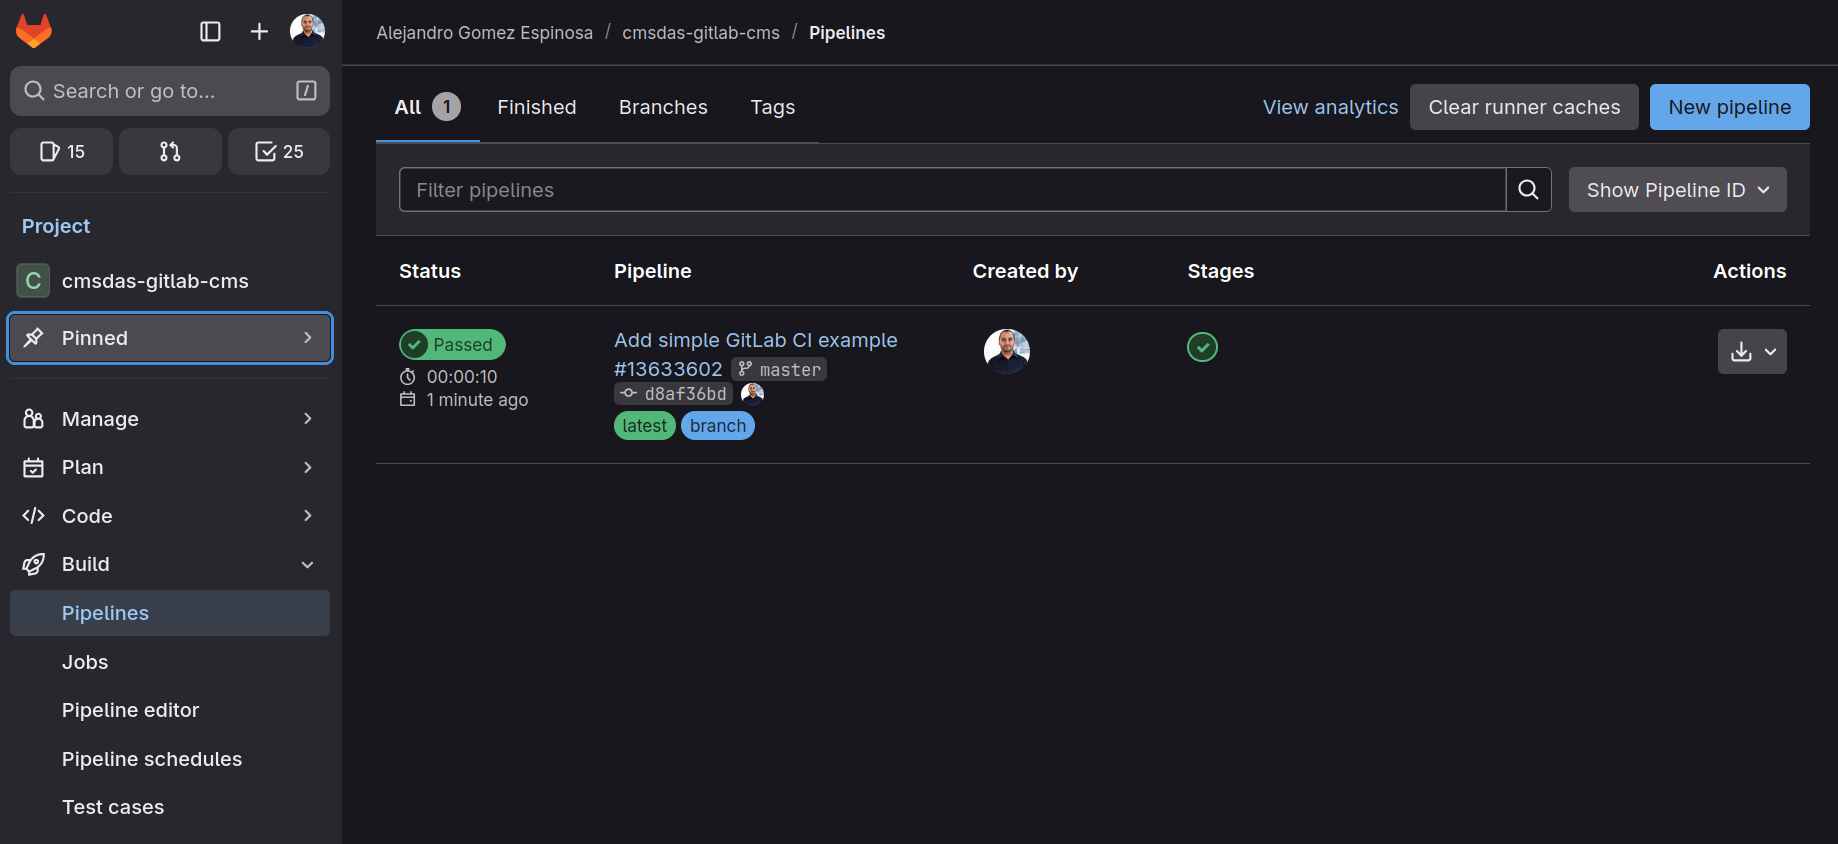
Every time you push to GitLab, it will run the test_job
and print a message in the pipeline logs.
Make sure to explore the Pipelines page to see how it works!
Example 2: A Two-Step GitLab CI Pipeline with Dependency
Now let’s make it a bit more interesting. In this example, the first step creates a file, and the second step uses that file. This shows how jobs can depend on each other.
-
Prepare: Create a file called
message.txtwith some text. -
Show: Display the contents of
message.txt(created by the previous step).
Update your .gitlab-ci.yml file to the following:
YAML
# .gitlab-ci.yml
stages:
  - prepare
  - show

prepare_job:
  stage: prepare
  script:
    - echo "Hello from the pipeline!" > message.txt
  artifacts:
    paths:
      - message.txt

show_job:
  stage: show
  script:
    - echo "The message is:"
    - cat message.txt
Try again the previous steps: 1. Update the
.gitlab-ci.yml file as above. 2. Add, commit, and push it
to your repository:
bash git add .gitlab-ci.yml git commit -m "Add two-step pipeline with dependency" git push
3. Go to your project’s CI/CD > Pipelines page on
GitLab to watch the jobs run in order!
What happens if you follow these instructions?
- When you push this file to GitLab, it will first run
prepare_job(createsmessage.txt). - The file
message.txtis saved as an artifact and passed to the next job. - Then,
show_jobruns and prints the contents ofmessage.txt.
Understanding the .gitlab-ci.yml File
The .gitlab-ci.yml file defines your pipeline. Here are
the main keywords and their purpose:
-
stages:
Lists the steps of your pipeline, in order. Each job is assigned to a stage. -
job:
Each job is a set of instructions to run. The job name is user-defined (e.g.,test_job,build_job). stage:
Specifies which stage the job belongs to.script:
The commands to execute for the job. You can list one or more shell commands.-
artifacts:
Files or directories to pass from one job to another (between stages).
Basic Syntax Rules:
- Indentation matters: use spaces, not tabs.
- The file must start with a list of stages.
- Each job must specify a stage and a script.
For more details, see the GitLab CI/CD documentation.
- GitLab CI/CD automates repetitive tasks and helps ensure code quality.
- Pipelines are defined in
.gitlab-ci.ymland consist of stages and jobs that run automatically on each push.
Content from A simple CMSSW example
Last updated on 2026-01-13 | Edit this page
Overview
Questions
- How can I compile my CMSSW analysis code?
- What is the correct way to add and organize my analysis code in a CMSSW work area?
- How can I verify that my code changes produce the expected results?
Objectives
- Successfully set up and compile example analysis code in a CMSSW environment.
- Understand how to organize and add your analysis code to the CMSSW work area.
- Learn how to test and compare analysis results after making code or selection changes.
If you are familiar with analysis development in CMSSW, you can skip ahead to the next lesson.
A Simple Example with CMSSW
Let’s walk through a basic example for CMSSW-based analyses. We’ll use a simple analysis code that selects pairs of electrons and muons, compile it in a CMSSW environment, and run it on a small dataset. This workflow is typical for HEP analysis at CERN. For you to understand the workflow, we will first try to run the analysis code on your “local” machine (cmslpc, lxplus, university machine).
What You’ll Do:
Step 1: Set Up Your CMSSW Environment
For this local test, create a new CMSSW work area outside your GitLab repository:
This sets up a fresh CMSSW work area.
If your analysis depends on other CMSSW packages, add them using:
This ensures all necessary packages are available.
If you see an error about missing git configuration, set your name and email:
BASH
Cannot find your details in the git configuration.
Please set up your full name via:
    git config --global user.name '<your name> <your last name>'
Please set up your email via:
    git config --global user.email '<your e-mail>'
Please set up your GitHub user name via:
    git config --global user.github <your github username>
There are a couple of options to make things work:
- set the config as described above,
- alternatively, create a
.gitconfigin your repository and use it as described here, - run
git cms-init --upstream-onlybeforegit cms-addpkgto disable setting up a user remote.
Always add CMSSW packages before compiling or adding analysis code
Adding CMSSW packages has to happen before adding or
compiling analysis code in the repository, since
git cms-addpkg will call git cms-init for the
$CMSSW_BASE/src directory, and git init
doesn’t work if the directory already contains files.
Step 2: Add Analysis Code to Your CMSSW Work Area
Your analysis code must be placed inside the work area’s
src directory, following the standard CMSSW structure
(e.g., AnalysisCode/MyAnalysis). Usually, your Git
repository contains only your analysis code, not the full CMSSW work
area.
In this example, we’ll use a sample analysis that selects pairs of
electrons and muons. The code is provided as a zip file, containing a
ZPeakAnalysis directory with plugins (C++
code) and test (Python config).
Download and extract the code:
BASH
# Go to your project folder from lesson 1
cd ~/nobackup/cmsdas/cmsdas-gitlab-cms/   # Use ~/nobackup for cmslpc users
wget https://github.com/FNALLPC/cmsdas-cat-gitlab-cms/raw/refs/heads/main/episodes/files/ZPeakAnalysis.zip
unzip ZPeakAnalysis.zip
Copy the analysis code into your CMSSW work area:
BASH
cd ${CMSSW_BASE}/src/
mkdir -p AnalysisCode
cp -r ~/cmsdas/cmsdas/cmsdas-gitlab-cms/ZPeakAnalysis AnalysisCode/
Now your code is in the right place for CMSSW to find and compile it.
Step 3: Compile the Code
Compile the analysis code:
The -j 4 flag uses 4 CPU cores for faster
compilation.
Step 4: Run the Analysis Code Locally
Now that the code is compiled, run it on a small dataset to test it:
BASH
cmsenv   # Good practice to ensure the environment is set
cd ${CMSSW_BASE}/src/AnalysisCode/ZPeakAnalysis/
cmsRun test/MyZPeak_cfg.py
OUTPUT
19-Dec-2025 15:46:09 CST  Initiating request to open file root://cmseos.fnal.gov//store/user/cmsdas/2026/short_exercises/cat/datasets/MINIAODSIM/RunIISummer20UL17MiniAODv2-106X_mc2017_realistic_v9-v2/DYJetsToLL_M-50_TuneCP5_13TeV-amcatnloFXFX-pythia8/2C5565D7-ADE5-2C40-A0E5-BDFCCF40640E.root
19-Dec-2025 15:46:15 CST  Successfully opened file root://cmseos.fnal.gov//store/user/cmsdas/2026/short_exercises/cat/datasets/MINIAODSIM/RunIISummer20UL17MiniAODv2-106X_mc2017_realistic_v9-v2/DYJetsToLL_M-50_TuneCP5_13TeV-amcatnloFXFX-pythia8/2C5565D7-ADE5-2C40-A0E5-BDFCCF40640E.root
Begin processing the 1st record. Run 1, Event 15930998, LumiSection 5897 on stream 0 at 19-Dec-2025 15:46:15.905 CST
Begin processing the 1001st record. Run 1, Event 15933554, LumiSection 5897 on stream 0 at 19-Dec-2025 15:46:32.266 CST
Begin processing the 2001st record. Run 1, Event 15936188, LumiSection 5898 on stream 0 at 19-Dec-2025 15:46:32.534 CST
Begin processing the 3001st record. Run 1, Event 130736047, LumiSection 48385 on stream 0 at 19-Dec-2025 15:46:32.809 CST
....
Begin processing the 54001st record. Run 1, Event 1743339, LumiSection 646 on stream 0 at 19-Dec-2025 15:46:48.177 CST
19-Dec-2025 15:46:48 CST  Closed file root://cmseos.fnal.gov//store/user/cmsdas/2026/short_exercises/cat/datasets/MINIAODSIM/RunIISummer20UL17MiniAODv2-106X_mc2017_realistic_v9-v2/DYJetsToLL_M-50_TuneCP5_13TeV-amcatnloFXFX-pythia8/2C5565D7-ADE5-2C40-A0E5-BDFCCF40640E.root
If everything went well, you should see an output file called
myZPeak.root. You can open it with ROOT to check the
histograms.
Step 5: Check the Number of Events
To check the number of events in your histograms, run:
This creates a text file called number_of_events.txt
with output like:
OUTPUT
muonMult: 54856.0
eleMult:  54856.0
mumuMass: 16324.0
Step 6: Modify the Selection and Compare Results
Now, let’s modify the selection criteria and compare the results:
-
Rerun the analysis with a modified selection:
This changes the minimum muon transverse momentum to 40 GeV.
-
Check the number of events again:
-
Compare the two results:
You should see a difference in the number of selected events due to the modified selection. For reference, expected results are provided in
test/number_of_expected_events.txt.
Why Compare results?
Creating a test to compare results is vital in analysis development!
As you develop your analysis, you’ll often modify selection criteria and code. This can lead to unintended changes in the number of selected events. By creating tests to compare results after each modification, you ensure your changes have the intended effect and do not introduce errors. This practice is crucial for maintaining the integrity of your analysis as it evolves.
- CMSSW analysis code must be placed inside the
srcdirectory of your CMSSW work area to be compiled. - Always add required CMSSW packages before copying or compiling your analysis code.
- Running and testing your analysis locally helps catch issues before automating with CI.
- Comparing results after code or selection changes is essential for reliable and reproducible analyses.
Content from Setting up CMSSW in GitLab CI/CD
Last updated on 2026-01-13 | Edit this page
Overview
Questions
- How do I run CMSSW in GitLab CI instead of on LXPLUS or cmslpc?
- Which runner tags provide CVMFS access, and how do I select them?
- What minimal steps must go into
.gitlab-ci.ymlto set up CMSSW?
Objectives
- Select and use a CVMFS-enabled runner (e.g.,
k8s-cvmfs) and verify/cvmfsis mounted. - Write a minimal
.gitlab-ci.ymlthat sets CMSSW (cmsset_default.sh,SCRAM_ARCH,cmsrel,cmsenv) and validates withcmsRun --help. - Understand CI isolation and ensure all environment setup is captured in the repository.
If you skipped the previous lessons, ensure you have:
- A GitLab repository at CERN GitLab (named
cmsdas-gitlab-cms). - The repository cloned to your local machine with an empty
.gitlab-ci.ymlfile. - The example analysis code downloaded and added to your repository.
What Do We Want to Achieve?
In the previous lesson, you ran a simple analysis workflow locally on your machine (cmslpc, lxplus, or university machine) with three steps:
- Compile the analysis code in a CMSSW environment.
- Run the analysis code on a small dataset.
- Check the number of events in the output.
These are steps you’ll repeat often during analysis development. Therefore, it’s a best practice to automate them using GitLab CI/CD, ensuring consistency and catching errors early.
Setting Up CMSSW in GitLab CI/CD
Understanding the CI Environment
When you use GitLab CI, your code is not executed on your own computer, but on a separate machine (called a runner) provided by CERN GitLab. Every time you push changes to your repository, the runner downloads your code and executes the pipeline steps in a clean environment.
Because of this isolation, you must ensure that all necessary setup—installing dependencies, configuring the environment, and preparing required files—is included in your CI configuration. This approach guarantees reproducibility, but also means you cannot rely on files or settings from your local machine: everything the pipeline needs must be version-controlled in your repository.
Choosing the Correct GitLab Runner
To run a GitLab CI pipeline, you need a .gitlab-ci.yml
file in your repository root. The simple pipeline from the previous
lesson had minimal software requirements, but running CMSSW analysis
requires special setup.
To use CMSSW in GitLab CI, you need access to CVMFS
(CERN Virtual Machine File System), a network file system optimized for
delivering software in high-energy physics. CVMFS provides access to
CMSSW, grid proxies, and other tools from /cvmfs/.
Standard GitLab
CI runners at CERN do not mount CVMFS by default. To get a runner
with CVMFS access, add a tags section to your
.gitlab-ci.yml:
Here’s a minimal example to verify CVMFS is mounted:
The job cvmfs_test simply lists the contents of
/cvmfs/cms.cern.ch/. If CVMFS is not mounted, this will
fail.
Challenge: Exploring Different Runners
Try these variations and observe what happens:
- Run the job without the
tagssection. What happens? - Run the job with the tag
cvmfsinstead ofk8s-cvmfs. What happens?
Discuss the differences. (Hint: Check the CERN GitLab CI runners documentation for details.)
After pushing, check your pipeline on the GitLab project page. You’ll
see the job logs and the k8s-cvmfs label indicating the
runner type.
Setting Up CMSSW in Your Pipeline
Now you’ll learn how to configure a GitLab CI job that properly sets up and uses CMSSW. This example is applicable to any CI job requiring CVMFS access and CMS-specific tools.
Important:
The default user in the runner container is not your username, and the container has no CMS-related environment setup. Unlike LXPLUS (where CMS members get automatic environment configuration via the zh group), everything must be set up manually in CI.
Steps to Set Up CMSSW
In a typical workflow on LXPLUS, you would run (do not run this, this is an example):
BASH
cmssw-el7
source /cvmfs/cms.cern.ch/cmsset_default.sh
cmsrel CMSSW_10_6_30
cd CMSSW_10_6_30/src
cmsenvLet’s break down what each command does:
-
cmssw-el7: Starts a CentOS 7 container. (CMSSW_10_6_30 is old and doesn’t have builds for newer LXPLUS systems.) -
source /cvmfs/cms.cern.ch/cmsset_default.sh: Sets up environment variables (adds/cvmfs/cms.cern.ch/commonto${PATH}) and defines helper functions likecmsrelandcmsenv. -
cmsrel CMSSW_10_6_30: Creates a new CMSSW release. (We are using an old version of CMSSW on purpose for this exercise.) -
cmsenv: Sets up the runtime environment for the release.
What are the actual commands behind
cmsenv and cmsrel?
The most important aliases are in the table below:
| Alias | Command |
|---|---|
cmsenv |
eval `scramv1 runtime -sh` |
cmsrel |
scramv1 project CMSSW |
The meaning of eval: The args are read
and concatenated together into a single command. This command is then
read and executed by the shell, and its exit status is returned as the
value of eval. If there are no args, or only null
arguments, eval returns 0.
Writing the .gitlab-ci.yml File
Now, translate the manual setup into a .gitlab-ci.yml
configuration:
YAML
cmssw_setup:
image: registry.cern.ch/docker.io/cmssw/el7:x86_64
tags:
  - k8s-cvmfs
variables:
CMS_PATH: /cvmfs/cms.cern.ch
script:
- set +u && source ${CMS_PATH}/cmsset_default.sh; set -u
- export SCRAM_ARCH=slc7_amd64_gcc700
- cmsrel CMSSW_10_6_30
- cd CMSSW_10_6_30/src
- cmsenv
- cmsRun --helpKey points:
-
image: Specifies a CentOS 7 container, equivalent to runningcmssw-el7locally. -
tags: Ensures the job runs on a runner with CVMFS access. -
variables: DefinesCMS_PATH, mirroring the LXPLUS environment. -
set +uandset -u: Temporarily allows unset variables (some setup scripts reference optional variables). This is a defensive coding practice. -
cmsRun --help: A simple test to verify CMSSW is properly configured.
Exercise: Verify CMSSW Setup
Update your .gitlab-ci.yml with the configuration above
and push it to GitLab. Check the pipeline logs to confirm:
- The job runs on a
k8s-cvmfsrunner. - The
cmsRun --helpcommand executes successfully.
What do the logs tell you about the CMSSW installation?
A common pitfall when setting up CMSSW in GitLab is that execution
fails because a setup script doesn’t follow best practices for shell
scripts (for example, returning non-zero exit codes even when setup is
OK, or using unset variables). Even if the script exits without a
visible error message, there could still be an issue. To avoid false
negatives, temporarily disable strict checks (set +u)
before running the setup command and re-enable them afterwards
(set -u).
- GitLab CI runs on remote runners; capture all environment setup in
.gitlab-ci.ymland do not rely on local machine files. - Use a CVMFS-enabled Kubernetes runner tag (e.g.,
k8s-cvmfs); theimage:keyword is only honored on Kubernetes runners; verify/cvmfs/cms.cern.chis accessible. - Set up CMSSW with
cmsset_default.sh,SCRAM_ARCH,cmsrel, andcmsenv, then validate withcmsRun --help. - Temporarily relax shell strict mode (
set +u…set -u) around setup to avoid failures from unset variables or non-standard exit codes; inspect job logs to diagnose issues.
Content from Running a CMSSW analysis in GitLab CI/CD
Last updated on 2026-01-13 | Edit this page
Overview
Questions
- How do I run my CMSSW analysis with GitLab CI instead of locally?
- How can I avoid re-downloading and rebuilding CMSSW on every CI job?
- How do artifacts help share build outputs between pipeline stages?
Objectives
- Run a CMSSW analysis job in GitLab CI using a CVMFS-enabled runner.
- Configure
.gitlab-ci.ymlto reuse a built CMSSW release via artifacts instead of rebuilding each time, and handle write-protection in downstream jobs. - Validate the analysis output (ROOT file and event counts) within the CI pipeline.
After successfully setting up CMSSW in GitLab CI/CD in the previous lesson, you are now ready to run the next steps of the analysis workflow from Episode 2: run the analysis on one file located in EOS via xrootd, apply some selections and check the number of events in the output.
Running a CMSSW Analysis in GitLab CI/CD
A Simple Job
First, ensure the analysis code is committed to your GitLab repository:
BASH
# Inside your gitlab repository cmsdas-gitlab-cms/
# Download and unzip the analysis code (wget https://github.com/FNALLPC/cmsdas-cat-gitlab-cms/raw/refs/heads/main/episodes/files/ZPeakAnalysis.zip)
git add ZPeakAnalysis/
git commit -m "Add analysis code"
git push
Then extend your .gitlab-ci.yml to set up CMSSW and run
the analysis with cmsRun:
YAML
cmssw_setup:
  image: registry.cern.ch/docker.io/cmssw/el7:x86_64
  tags:
    - k8s-cvmfs
  variables:
    CMS_PATH: /cvmfs/cms.cern.ch
  script:
    - echo "Setting up CMSSW environment"
    - set +u && source ${CMS_PATH}/cmsset_default.sh; set -u
    - export SCRAM_ARCH=slc7_amd64_gcc700
    - cmsrel CMSSW_10_6_30
    - cd CMSSW_10_6_30/src
    - cmsenv
    - echo "Copying analysis code"
    - mkdir -p AnalysisCode
    - cp -r $CI_PROJECT_DIR/ZPeakAnalysis AnalysisCode/
    - scram b -j 4
    - cd AnalysisCode/ZPeakAnalysis/
    - echo "Running analysis code"
    - cmsRun test/MyZPeak_cfg.py
    - ls -l myZPeak.root
    - echo "Checking number of events"
    - python test/check_number_events_cmssw10.py
    - echo "Testing output"
- python test/check_cutflows_cmssw10.py number_of_events.txt test/number_of_expected_events.txtDo you see any potential issues with this job definition?
The job above will work, but it’s inefficient:
- CMSSW setup (release download, build) runs every time.
- If you want multiple datasets, you’d duplicate the job and repeat the setup.
Using Artifacts for Efficiency
Use artifacts so you set up and build CMSSW once, then reuse it:
YAML
stages:
  - compile
  - run
  - check

cmssw_compile:
  image: registry.cern.ch/docker.io/cmssw/el7:x86_64
  stage: compile
  tags:
    - k8s-cvmfs
  variables:
    CMS_PATH: /cvmfs/cms.cern.ch
    CMSSW_RELEASE: CMSSW_10_6_30
    SCRAM_ARCH: slc7_amd64_gcc700
  script:
    - set +u && source ${CMS_PATH}/cmsset_default.sh; set -u
    - export SCRAM_ARCH=${SCRAM_ARCH}
    - cmsrel ${CMSSW_RELEASE}
    - cd ${CMSSW_RELEASE}/src
    - cmsenv
    - mkdir -p AnalysisCode
    - cp -r $CI_PROJECT_DIR/ZPeakAnalysis AnalysisCode/
    - cd ${CMSSW_BASE}/src
    - scram b -j 4
  artifacts:
    untracked: true
    expire_in: 1 hour
    paths:
      - ${CMSSW_RELEASE}

cmssw_run:
  needs:
    - cmssw_compile
  stage: run
  image: registry.cern.ch/docker.io/cmssw/el7:x86_64
  tags:
    - k8s-cvmfs
  variables:
    CMS_PATH: /cvmfs/cms.cern.ch
    CMSSW_RELEASE: CMSSW_10_6_30
    SCRAM_ARCH: slc7_amd64_gcc700
  script:
    - set +u && source ${CMS_PATH}/cmsset_default.sh; set -u
    - export SCRAM_ARCH=${SCRAM_ARCH}
    - mkdir -p run
    - cp -r ${CMSSW_RELEASE} run/
    - chmod -R +w run/${CMSSW_RELEASE}/
    - cd run/${CMSSW_RELEASE}/src
    - cmsenv
    - mkdir -p AnalysisCode
    - cp -r $CI_PROJECT_DIR/ZPeakAnalysis AnalysisCode/
    - cd AnalysisCode/ZPeakAnalysis/
    - cmsRun test/MyZPeak_cfg.py
    - ls -l myZPeak.root
  artifacts:
    untracked: true
    expire_in: 1 hour
    paths:
      - ${CMSSW_RELEASE}/src/AnalysisCode/ZPeakAnalysis/myZPeak.root

check_events:
  needs:
    - cmssw_compile
    - cmssw_run
  stage: check
  image: registry.cern.ch/docker.io/cmssw/el7:x86_64
  tags:
    - k8s-cvmfs
  variables:
    CMS_PATH: /cvmfs/cms.cern.ch
    CMSSW_RELEASE: CMSSW_10_6_30
    SCRAM_ARCH: slc7_amd64_gcc700
  script:
    - set +u && source ${CMS_PATH}/cmsset_default.sh; set -u
    - export SCRAM_ARCH=${SCRAM_ARCH}
    - mkdir -p run
    - cp -r ${CMSSW_RELEASE} run/
    - chmod -R +w run/${CMSSW_RELEASE}/
    - cd run/${CMSSW_RELEASE}/src
    - cmsenv
    - mkdir -p AnalysisCode
    - cp -r $CI_PROJECT_DIR/ZPeakAnalysis AnalysisCode/
    - cd AnalysisCode/ZPeakAnalysis/
    - python test/check_number_events_cmssw10.py --input ${CMSSW_RELEASE}/src/AnalysisCode/ZPeakAnalysis/myZPeak.root
    - python test/check_cutflows_cmssw10.py number_of_events.txt test/number_of_expected_events.txt
For the compiled code to be available in subsequent steps, the
artifacts must be explicitly defined. In the cmssw_compile
job, we specify:
Key options:
-
untracked: true: Includes files not tracked by git (ignores.gitignore), ensuring the full CMSSW build area is captured. -
expire_in: Specifies how long artifacts are kept before automatic deletion. Use1 hourfor testing or1 weekfor longer workflows. -
paths: Lists directories/files to preserve. Here,${CMSSW_RELEASE}captures the entire CMSSW work area.
Artifacts Are Write-Protected
Artifacts are write-protected by default. You cannot modify files directly in the artifact directory in downstream jobs.
To work around this, copy the artifact to a new directory and add write permissions:
YAML
script:
- set +u && source ${CMS_PATH}/cmsset_default.sh; set -u
- export SCRAM_ARCH=${SCRAM_ARCH}
- mkdir -p run
- cp -r ${CMSSW_RELEASE} run/
- chmod -R +w run/${CMSSW_RELEASE}/
- cd run/${CMSSW_RELEASE}/src
- cmsenv
- mkdir -p AnalysisCode
- cp -r $CI_PROJECT_DIR/ZPeakAnalysis AnalysisCode/
- cd AnalysisCode/ZPeakAnalysis/
- cmsRun test/MyZPeak_cfg.pyThis ensures cmssw_run and check_events can
reuse the built CMSSW area without rebuilding, while still being able to
write output files.
Using needs vs dependencies
In the pipeline above, we use the needs keyword to
define job dependencies:
Differences between needs and
dependencies:
| Keyword | Behavior |
|---|---|
needs |
Job starts immediately when the needed job completes, regardless of stage. Enables parallelism. |
dependencies |
Job starts only when all jobs in the prior stage complete. Strictly follows stage order. |
Best practice: Use needs for faster
pipelines—it allows jobs to start as soon as their dependencies are met,
rather than waiting for an entire stage to finish.
How does this updated pipeline improve efficiency?
-
cmssw_compilesets up and builds CMSSW once and stores it as an artifact. -
cmssw_runreuses that artifact and skips re-building. - Global variables can avoid repetition:
YAML
...
variables:
CMS_PATH: /cvmfs/cms.cern.ch
CMSSW_RELEASE: CMSSW_10_6_30
SCRAM_ARCH: slc7_amd64_gcc700
cmssw_compile:
image: registry.cern.ch/docker.io/cmssw/el7:x86_64
stage: compile
tags:
- k8s-cvmfs
script:
- set +u && source ${CMS_PATH}/cmsset_default.sh; set -u
- export SCRAM_ARCH=${SCRAM_ARCH}
...If yes, you dont need the rest of the lessons. If they are failing, continue with the next lesson.
- GitLab CI runs on remote runners; every dependency and setup step
must be in
.gitlab-ci.yml. - Use CVMFS-enabled Kubernetes runners (
k8s-cvmfs); theimage:keyword is honored only there. - Split the pipeline into stages and pass the built CMSSW area via artifacts to avoid rebuilding in each job.
- Validate outputs in CI (e.g.,
myZPeak.root, event counts) to catch issues early; inspect job logs for failures. - Artifacts are write-protected by default; downstream jobs must copy
them to a writable directory using
mkdir,cp -r, andchmod -R +w. - Define artifacts with
untracked: trueto capture build outputs, and setexpire_into control automatic cleanup (e.g.,1 hourfor testing,1 weekfor production). - Use the
needskeyword for faster pipelines—jobs start immediately when dependencies complete, rather than waiting for entire stages to finish.dependenciesis an alternative that strictly respects stage order.
Content from Securely adding passwords and files to GitLab
Last updated on 2026-01-14 | Edit this page
Overview
Questions
- How can I securely store my grid certificate and password in GitLab without exposing them?
- Why can’t I simply copy my grid certificate files into my GitLab repository?
- How do I restore and use grid credentials in a CI job?
Objectives
- Understand why grid credentials must be encoded and stored as protected CI/CD variables.
- Encode grid certificates and passwords using
base64and add them securely to GitLab. - Restore grid certificate files and obtain a VOMS proxy in a CI job to access CMS data.
- A valid grid certificate issued by CERN, and installed in
~/.globus/usercert.pemand~/.globus/userkey.pem.
Unless you are very familiar with CMSSW and CMS data access, the previous pipeline will likely fail when trying to access data on EOS via XRootD. This is because accessing CMS data typically requires a valid grid proxy.
In your local environment (e.g., LXPLUS or cmslpc), you obtain a grid
proxy using the voms-proxy-init command, which relies on
your grid certificate files (usercert.pem and
userkey.pem) stored in ~/.globus/. However,
GitLab CI jobs run in isolated environments and have no
access to your local grid proxy.
Additionally, you must never store grid certificate files or passwords directly in your GitLab repository—this would expose sensitive information. Instead, securely add them as CI/CD variables in GitLab.
Obtaining a Grid Certificate
To access CMS data, you need a grid certificate (also called a Virtual Organization Membership Service (VOMS) proxy). If you don’t have one yet, request it from the CERN Grid CA, or follow these instructions.
Your grid certificate consists of two files:
Output (example):
OUTPUT
Bag Attributes
localKeyID: 95 A0 95 B0 1e AB BD 13 59 D1 D2 BB 35 5A EA 2E CD 47 BA F7
subject=/DC=ch/DC=cern/OU=Organic Units/OU=Users/CN=username/CN=123456/CN=Anonymous Nonamious
issuer=/DC=ch/DC=cern/CN=CERN Grid Certification Authority
-----BEGIN CERTIFICATE-----
TH1s1SNT4R34lGr1DC3rt1f1C4t3But1Th4s4l3NgtH0F64CH4r4ct3rSP3rL1N3
...
-----END CERTIFICATE-----Keep your secrets secret
Never expose your grid certificate files or passwords!
- Never store certificates or passwords in version control. Even if
you delete them from
HEAD, they remain in the commit history. - Storing secrets in a shared repository violates grid policy and can lead to access revocation.
- If you accidentally commit sensitive data, immediately follow GitHub or GitLab removal guides—but treat the data as compromised.
For more details, see GitLab CI/CD variables documentation.
Encoding Certificates with base64
GitLab variables must be plain strings without line breaks. To
preserve the structure of your certificate files, encode them using
base64.
Example: Encoding a Certificate
(On Linux, add -w 0 to disable line wrapping; on macOS,
use -D to decode instead of -d.)
Output (example):
OUTPUT
QmFnIEF0dHJpYnV0ZXMKICAgIGxvY2FsS2V5SUQ6IDk1IEEwIDk1IEIwIDFlIEFCIEJEIDEzIDU5IEQxIEQyIEJCIDM1IDVBIEVBIDJFIENEIDQ3IEJBIEY3CnN1YmplY3Q9L0RDPWNoL0RDPWNlcm4vT1U9T3JnYW5pYyBVbml0cy9PVT1Vc2Vycy9DTj11c2VybmFtZS9DTj0xMjM0NTYvQ049QW5vbnltb3VzIE5vbmFtaW91cwppc3N1ZXI9L0RDPWNoL0RDPWNlcm4vQ049Q0VSTiBHcmlkIENlcnRpZmljYXRpb24gQXV0aG9yaXR5Ci0tLS0tQkVHSU4gQ0VSVElGSUNBVEUtLS0tLQpUSDFzMVNOVDRSMzRsR3IxREMzcnQxZjFDNHQzQnV0MVRoNHM0bDNOZ3RIMEY2NENINHI0Y3QzclNQM3JMMU4zCjFhbVQwMExhMllUMHdSMVQzNDVtMHIzbDFOM1MwZm4wbnMzTlMzUzAxL2xMU3QwcEgzcjNBbmRBRGRzUEFjM1MKLi4uNDUgbW9yZSBsaW5lcyBvZiBsMzN0IGRpYWxlY3QuLi4KKzRuZCtoZUw0UyszOGNINHI0YytlcnNCZWYwckUrSEUxK2VuRHM9PQotLS0tLUVORCBDRVJUSUZJQ0FURS0tLS0tCg==To verify encoding works, decode it back:
This should return your original certificate.
Decode a Secret Message
Try decoding this base64-encoded message:
SSB3aWxsIG5ldmVyIHB1dCBteSBzZWNyZXRzIHVuZGVyIHZlcnNpb24gY29udHJvbAo=Use the base64 command with the -d (Linux)
or -D (macOS) flag.
Adding Secrets to GitLab
Now encode your grid password and certificates. For your password:
(Use single quotes ', not double quotes ".
Include -w 0 on Linux.)
Adding Variables in GitLab
Now we know how to encode our grid certificate files, we can add them as CI/CD variables in GitLab. These variables are passed to the job environment when a job is run, and can be used in the job scripts. This way, we can avoid storing sensitive information directly in the repository.
Adding Grid Certificate and Password to GitLab
Now that we know how to encode our grid certificate files, we can add them as CI/CD variables in GitLab. These variables are passed to the job environment when a job runs, and can be used in the job scripts. This way, we avoid storing sensitive information directly in the repository.
There are a couple of important things to keep in mind when adding passwords and certificates as variables to GitLab:
-
Variables should always be set to
Protectedstate. This ensures that they are only available in protected branches, e.g., yourmasterormainbranch. This is important when collaborating with others, since anyone with access could simplyechothe variables in a merge request if automated tests run on merge requests. -
As an additional safety measure, set them as
Maskedas well if possible. This will prevent your password from appearing in job logs. (Note: masking may not work perfectly for certificates due to their length, but should work for your grid password.)
For more details, see the GitLab CI/CD variables documentation. If you upload sensitive data by mistake, immediately follow the guidance on Removing Sensitive data on Github or on Gitlab.
Encoding Your Credentials
For your grid proxy password, encode it using base64
(make sure nobody’s peeking at your screen):
Use single quotes ('), not double quotes
("). On Linux, add -w 0 to disable line
wrapping (by default, base64 wraps after 76 characters).
For the two certificates, use them directly as input:
Copy the full output into GitLab.
Every Equal Sign Counts!
Make sure to copy the full string including trailing equal signs.
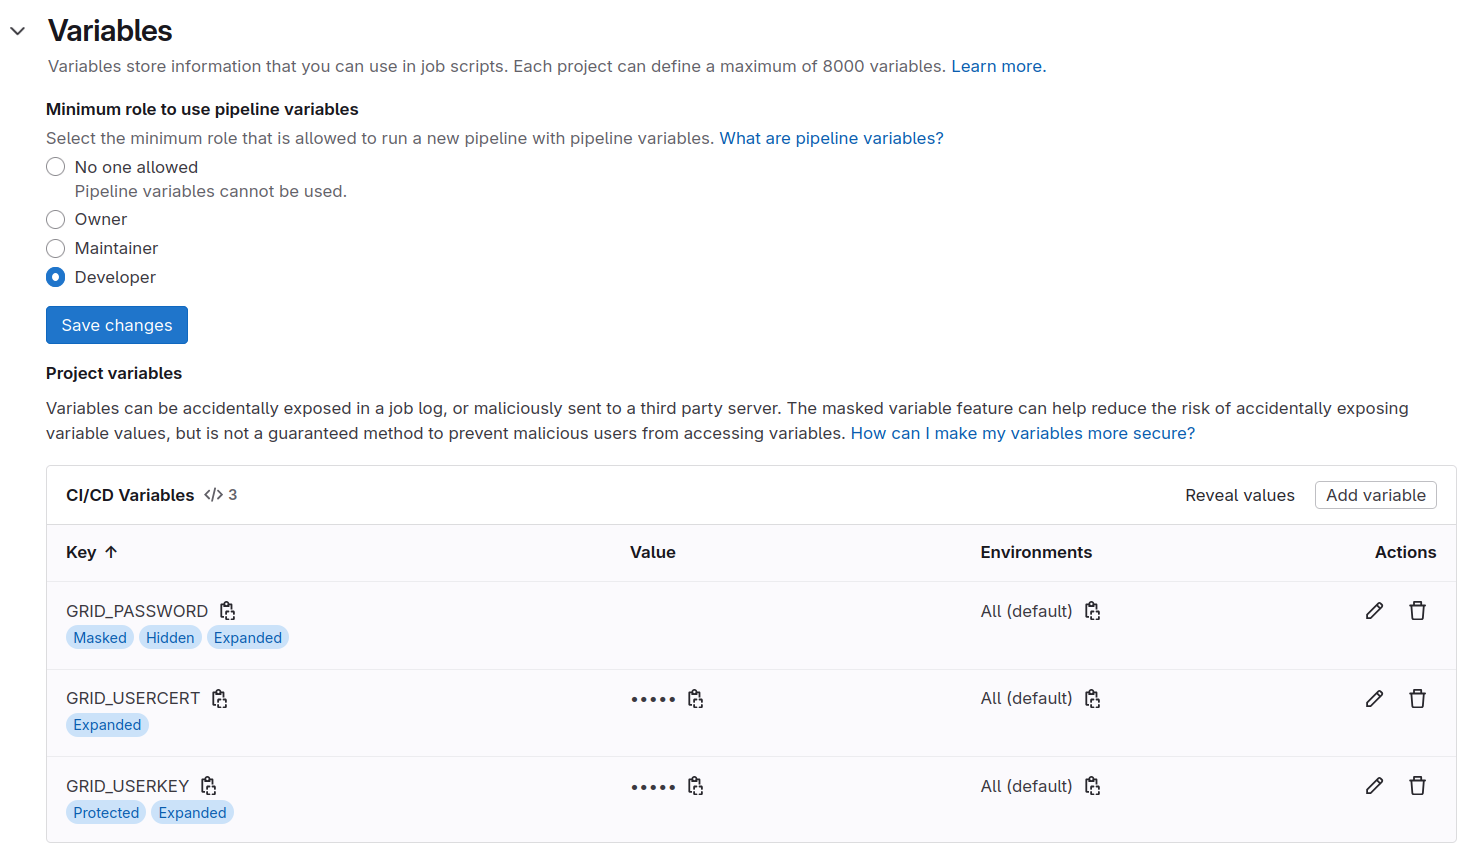
Adding Variables in GitLab UI
Go to Settings > CI/CD > Variables in your GitLab project. Add the following three variables:
| Variable | Value |
|---|---|
GRID_PASSWORD |
(base64-encoded password) |
GRID_USERCERT |
(base64-encoded usercert.pem) |
GRID_USERKEY |
(base64-encoded userkey.pem) |
For each variable:
- Check Protected (so it’s only available on
protected branches like
master/main). - Check Masked (so values won’t appear in job logs—especially important for the password).
The Settings > CI/CD > Variables section should look like this:
Protect Your Main Branch
To reduce the risk of leaking passwords and certificates to others,
go to Settings > Repository > Protected Branches
and protect your master or main branch. This
prevents collaborators from pushing directly and accidentally exposing
secrets in job logs.
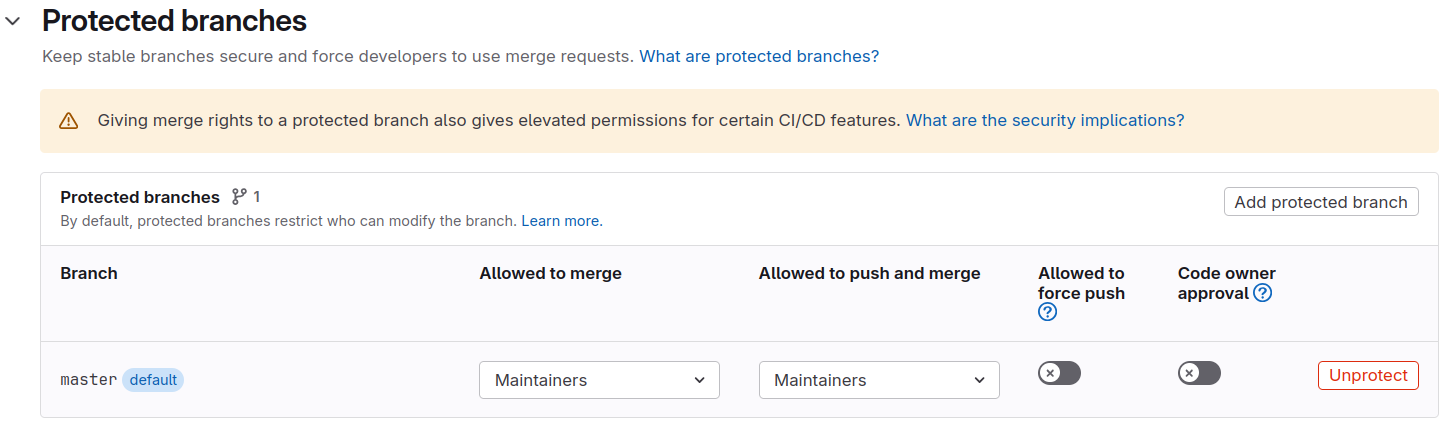
With the Protected option enabled for variables, they are only available to those protected branches (though Maintainers can still push to them).
Using the Grid Proxy in CI
With secrets stored, you can now restore the certificate files and obtain a grid proxy in your CI job:
BASH
mkdir -p ${HOME}/.globus
printf "${GRID_USERCERT}" | base64 -d > ${HOME}/.globus/usercert.pem
printf "${GRID_USERKEY}" | base64 -d > ${HOME}/.globus/userkey.pem
chmod 400 ${HOME}/.globus/userkey.pem
printf "${GRID_PASSWORD}" | base64 -d | voms-proxy-init --voms cms --pwstdin
voms-proxy-info --allExample GitLab CI Job
The standard CentOS 7 CMSSW image lacks CMS-specific certificates. Use the CMS-specific image instead:
YAML
voms_proxy_test:
image:
name: gitlab-registry.cern.ch/cms-cloud/cmssw-docker/cc7-cms:latest
entrypoint: [""]
stage: compile
tags:
- k8-cvmfs
script:
- mkdir -p ${HOME}/.globus
- printf "${GRID_USERCERT}" | base64 -d > ${HOME}/.globus/usercert.pem
- printf "${GRID_USERKEY}" | base64 -d > ${HOME}/.globus/userkey.pem
- chmod 400 ${HOME}/.globus/userkey.pem
- printf "${GRID_PASSWORD}" | base64 -d | voms-proxy-init --voms cms --pwstdin
- voms-proxy-info --all
- voms-proxy-destroyThe entrypoint: [""] override is needed to ensure the
job runs your custom script instead of a default entrypoint.
Test Your Setup
Before moving to the next section, commit and push your
.gitlab-ci.yml, navigate to CI/CD >
Pipelines, and verify:
- The job runs on a
cvmfsrunner. -
voms-proxy-initsucceeds without errors. -
voms-proxy-infodisplays your proxy details.
If proxy creation fails, check the job logs and verify all three variables are set correctly (especially trailing equal signs in base64 strings).
Once your grid proxy works, you can extend the pipeline to run your
analysis with cmsRun and access CMS data on EOS!
Even with the voms_proxy_test job added, you still need
to export your grid proxy as artifact and added in the analysis job to
access data on EOS.
Here is an example of how to do this:
YAML
stages:
- compile
- run
- check
variables:
CMS_PATH: /cvmfs/cms.cern.ch
CMSSW_RELEASE: CMSSW_10_6_30
SCRAM_ARCH: slc7_amd64_gcc700
cmssw_compile:
image: registry.cern.ch/docker.io/cmssw/el7:x86_64
stage: compile
tags:
- k8s-cvmfs
script:
- set +u && source ${CMS_PATH}/cmsset_default.sh; set -u
- export SCRAM_ARCH=${SCRAM_ARCH}
- cmsrel ${CMSSW_RELEASE}
- cd ${CMSSW_RELEASE}/src
- cmsenv
- mkdir -p AnalysisCode
- cp -r $CI_PROJECT_DIR/ZPeakAnalysis AnalysisCode/
- cd ${CMSSW_BASE}/src
- scram b -j 4
artifacts:
  untracked: true
  expire_in: 1 hour
  paths:
    - ${CMSSW_RELEASE}
voms_proxy_test:
stage: compile
image: gitlab-registry.cern.ch/cms-cloud/cmssw-docker/al9-cms:latest
tags:
- k8s-cvmfs
script:
- mkdir -p ${HOME}/.globus
- printf "${GRID_USERCERT}" | base64 -d > ${HOME}/.globus/usercert.pem
- printf "${GRID_USERKEY}" | base64 -d > ${HOME}/.globus/userkey.pem
- chmod 400 ${HOME}/.globus/userkey.pem
- printf "${GRID_PASSWORD}" | base64 -d | voms-proxy-init --voms cms --pwstdin
- voms-proxy-info --all
- export VOMSPROXY=$(voms-proxy-info -path)
- mkdir proxy
- cp ${VOMSPROXY} proxy/x509_proxy
artifacts:
paths:
- proxy
cmssw_run:
needs:
- cmssw_compile
- voms_proxy_test
stage: run
image: registry.cern.ch/docker.io/cmssw/el7:x86_64
tags:
- k8s-cvmfs
script:
- set +u && source ${CMS_PATH}/cmsset_default.sh; set -u
- export SCRAM_ARCH=${SCRAM_ARCH}
- export X509_USER_PROXY=${PWD}/proxy/x509_proxy
- mkdir run
- cp -r ${CMSSW_RELEASE} run/
- chmod -R +w run/${CMSSW_RELEASE}/
- cd run/${CMSSW_RELEASE}/src
- cmsenv
- voms-proxy-info --all
- cd AnalysisCode/ZPeakAnalysis/
- cmsRun test/MyZPeak_cfg.py
#- cmsRun test/MyZPeak_cfg.py inputFiles=root://cms-xrd-global.cern.ch//store/user/cmsdas/2026/short_exercises/cat/datasets/MINIAODSIM/RunIISummer20UL17MiniAODv2-106X_mc2017_realistic_v9-v2/DYJetsToLL_M-50_TuneCP5_13TeV-amcatnloFXFX-pythia8/2C5565D7-ADE5-2C40-A0E5-BDFCCF40640E.root #### in case the previous does not work
- ls -l myZPeak.root
artifacts:
untracked: true
expire_in: 1 hour
paths:
- run/${CMSSW_RELEASE}/src/AnalysisCode/ZPeakAnalysis/myZPeak.root
check_events:
needs:
- cmssw_compile
- cmssw_run
stage: check
image: registry.cern.ch/docker.io/cmssw/el7:x86_64
tags:
- k8s-cvmfs
script:
- set +u && source ${CMS_PATH}/cmsset_default.sh; set -u
- export SCRAM_ARCH=${SCRAM_ARCH}
- cp -r ${CMSSW_RELEASE} run/
- chmod -R +w run/${CMSSW_RELEASE}/
- cd run/${CMSSW_RELEASE}/src
- cmsenv
- cd AnalysisCode/ZPeakAnalysis/
- python test/check_number_events.py --input ${CMSSW_BASE}/src/AnalysisCode/ZPeakAnalysis/myZPeak.root
- python test/check_cutflows.py number_of_events.txt test/number_of_expected_events.txt- Never store grid certificates or passwords in version control; they remain in commit history and violate grid policy.
- Encode grid certificates and passwords with
base64and store them as protected CI/CD variables in GitLab. - Set variables to
Protected(available only on protected branches) andMasked(hidden in logs) for maximum security. - Restore grid certificate files and obtain a VOMS proxy in CI jobs
using
base64 -dandvoms-proxy-init --pwstdin.
Content from CAT services for GitLab CI
Last updated on 2026-01-14 | Edit this page
Overview
Questions
- How can I access CMS data stored on EOS from GitLab CI without managing my own grid certificates?
- What are CAT services and why do they only work in the
cms-analysisnamespace? - How do I request authentication tokens for EOS access and VOMS proxies in CI jobs?
Objectives
- Understand the purpose and security model of CAT services for GitLab CI.
- Use the CAT EOS file service to access CMS data on EOS via JWT-authenticated tokens.
- Use the CAT VOMS proxy service to obtain a grid proxy for the CMS VO without storing personal certificates.
Did you find it difficult to access CMS data in GitLab CI/CD?
Accessing CMS data stored on EOS or using grid resources in GitLab CI/CD can be challenging, especially for newcomers. You must manage authentication, permissions, and complex data access methods. The Common Analysis Tools (CAT) group in CMS provides services to simplify these tasks.
Why CERN GitLab Instead of GitHub?
CERN GitLab is tailored for the CERN community and offers seamless integration with CERN infrastructure: CVMFS, EOS storage, and grid computing resources. This makes it ideal for CMS analysts working with large datasets and complex workflows.
If you host your analysis on GitHub, you must manually set up access to CMS resources—a cumbersome and error-prone process. CERN GitLab lets you leverage CAT services that simplify data access and authentication, so you can focus on analysis rather than infrastructure.
The cms-analysis user code space
The Common Analysis Tools (CAT) group maintains a dedicated CERN GitLab namespace called cms-analysis, where any CMS member can store their analysis code. It is documented in the CAT documentation pages.
The namespace is organized into groups and subgroups following the CMS Physics Coordination structure. You can request an area in the PAG-specific group that best matches your analysis.
Request an Area Anytime
Keep your analysis code under version control from the start. You can request an area at any stage (in fact we invite you to do so):
- You can create an area with a temporary name initially, then rename it to match your CADI line when the analysis matures.
- Request an area for your analysis at cms-analysis.
The services described here only work in cms-analysis
For security reasons, the services described here only work
if your project is in the cms-analysis
namespace.
To move your current project:
- Go to this
website to ask for access to the
cms-analysisnamespace. More about it here. - Go to Settings > General > Advanced > Transfer project.
- Select
cms-analysis/CMSDAS/CAT-tutorialsas the new namespace (for testing). - For production work, select the relevant POG/PAG subgroup.
Using the CAT EOS file service
CAT maintains a service account, cmscat, that has CMS VO
membership and can access EOS. CAT provides a service to request
short-lived EOS tokens in CI jobs, allowing you to access CMS files on
behalf of the cmscat service account.
Files accessible:
/eos/cms/store/group/cat
For detailed documentation, see the CAT CI dataset service.
The file you need is not there?
If the file you need is not in /eos/cms/store/group/cat,
request it by creating a merge request to cms-analysis/services/ci-dataset-files.
How the Service Works
Two steps are required:
Step 1: Configure your job to create a JWT (JSON Web Token) for authentication:
Step 2: Query the CAT service to get a short-lived EOS token:
BASH
XrdSecsssENDORSEMENT=$(curl -H "Authorization: ${MY_JOB_JWT}" "https://cms-cat-ci-datasets.app.cern.ch/api?eospath=${EOSPATH}" | tr -d \")Then access the file using:
Where EOSPATH is a variable holding a path of a file on
EOS. Now you can access the file with a path that includes the newly
generated token at the end, as:
root://eoscms.cern.ch/${EOSPATH}?authz=${XrdSecsssENDORSEMENT}&xrd.wantprot=unix.
YAML
test_eos_service:
image:
name: registry.cern.ch/docker.io/cmssw/el7:x86_64
tags:
- cvmfs
id_tokens:
  MY_JOB_JWT:
    aud: "cms-cat-ci-datasets.app.cern.ch"
variables:
EOSPATH: '/eos/cms/store/group/cat/datasets/MINIAODSIM/RunIISummer20UL17MiniAODv2-106X_mc2017_realistic_v9-v2/DYJetsToLL_M-50_TuneCP5_13TeV-amcatnloFXFX-pythia8/2C5565D7-ADE5-2C40-A0E5-BDFCCF40640E.root'
EOS_MGM_URL: root://eoscms.cern.ch
before_script:
- 'XrdSecsssENDORSEMENT=$(curl -H "Authorization: ${MY_JOB_JWT}" "https://cms-cat-ci-datasets.app.cern.ch/api?eospath=${EOSPATH}" | tr -d \")'
script:
- xrdcp "${EOS_MGM_URL}/${EOSPATH}?authz=${XrdSecsssENDORSEMENT}&xrd.wantprot=unix" test.root
- ls -l test.rootUsing the CAT VOMS Proxy Service
The cmscat service account is a CMS VO member and can
request VOMS proxies. If your project is in cms-analysis,
it can request a VOMS proxy from a service at
cms-cat-grid-proxy-service.app.cern.ch, in much the same
way as the CAT EOS service requests a proxy to
cms-cat-ci-datasets.app.cern.ch above.
The proxy is returned as a base64-encoded string with a
lifetime matching your CI job duration.
Exercise: Set up a CI Job to Obtain a Grid Proxy
Set up a CI job that retrieves and validates a VOMS proxy from the CAT service.
Step 1: Configure your job to create a JWT:
Step 2: Query the CAT service to get a proxy:
BASH
proxy=$(curl --fail-with-body -H "Authorization: ${MY_JOB_JWT}" "https://cms-cat-grid-proxy-service.app.cern.ch/api" | tr -d \")Step 3: Decode and store the proxy:
Important: CVMFS and Environment Variables
Your image must have CVMFS mounted (e.g.,
tags: [cvmfs]). Depending on the image environment, you may
also need to export grid security variables:
YAML
- export X509_VOMS_DIR=/cvmfs/grid.cern.ch/etc/grid-security/vomsdir/
- export VOMS_USERCONF=/cvmfs/grid.cern.ch/etc/grid-security/vomses/
- export X509_CERT_DIR=/cvmfs/grid.cern.ch/etc/grid-security/certificates/YAML
test_proxy_service:
image:
name: registry.cern.ch/docker.io/cmssw/el7:x86_64
tags:
- cvmfs
id_tokens:
  MY_JOB_JWT:
    aud: "cms-cat-grid-proxy-service.app.cern.ch"
before_script:
- 'proxy=$(curl -H "Authorization: ${MY_JOB_JWT}" "https://cms-cat-grid-proxy-service.app.cern.ch/api" | tr -d \")'
script:
  - printf $proxy | base64 -d > myproxy
  - export X509_USER_PROXY=$(pwd)/myproxy
- export X509_CERT_DIR=/cvmfs/grid.cern.ch/etc/grid-security/certificates/
- voms-proxy-infoWith both CAT services in place, you now have automatic, secure access to CMS data and grid resources in your CI pipeline—no manual certificate management required!
- CAT services simplify CMS resource access in GitLab CI by eliminating manual certificate and credential management.
- CAT services only work in the
cms-analysisnamespace for security; move your project there via Settings > General > Advanced > Transfer project. - The CAT EOS file service provides JWT-authenticated access to
datasets in
/eos/cms/store/group/catvia thecmscatservice account. - The CAT VOMS proxy service provides short-lived grid proxies without storing personal certificates; proxies are returned as base64-encoded strings.
- Both services require configuring
id_tokensin.gitlab-ci.ymland querying CAT endpoints to retrieve authentication tokens.
Content from Putting It All Together: Final Run with CAT Services
Last updated on 2025-12-23 | Edit this page
Overview
Questions
- How do I combine CMSSW compilation, data access, and authentication into a single CI/CD pipeline?
- What are the trade-offs between using personal grid credentials versus CAT services?
- How can I use both CAT EOS and VOMS proxy services in the same pipeline?
Objectives
- Create a complete
.gitlab-ci.ymlpipeline that compiles CMSSW, obtains authentication, and runs analysis on EOS data. - Implement data access using either CAT EOS file service or CAT VOMS proxy service.
- Compare and choose between personal credentials and CAT services based on your workflow.
Putting It All Together: Final Run with CAT Services
In this final episode, you will combine everything you’ve learned to build a complete GitLab CI/CD pipeline that runs a CMSSW analysis using CAT services for data access and authentication. Your pipeline will include:
- Set up the CMSSW environment — Configure CMSSW version and environment variables.
- Obtain authentication — Use CAT services or personal grid credentials for CMS resource access.
- Access CMS data on EOS — Read input datasets via XRootD.
- Run the CMSSW analysis — Execute analysis code on input data.
- Validate output — Store and review analysis results.
Accessing Files on EOS via XRootD
Most analyses run on centrally produced files stored on EOS. To access them, you need a valid grid proxy for the CMS Virtual Organisation (VO).
We have already used EOS files in previous lessons. For this final example, we’ll explicitly define and use a single file from the DYJetsToLL dataset.
A copy is stored permanently on EOS at:
OUTPUT
/eos/cms/store/group/cat/datasets/MINIAODSIM/RunIISummer20UL17MiniAODv2-106X_mc2017_realistic_v9-v2/DYJetsToLL_M-50_TuneCP5_13TeV-amcatnloFXFX-pythia8/2C5565D7-ADE5-2C40-A0E5-BDFCCF40640E.rootTest Locally First
Before running in CI, test file access on your local machine:
BASH
cd ${CMSSW_BASE}/src/AnalysisCode/ZPeakAnalysis/
cmsRun test/MyZPeak_cfg.py inputFiles=/store/group/cat/datasets/MINIAODSIM/RunIISummer20UL17MiniAODv2-106X_mc2017_realistic_v9-v2/DYJetsToLL_M-50_TuneCP5_13TeV-amcatnloFXFX-pythia8/2C5565D7-ADE5-2C40-A0E5-BDFCCF40640E.root
ls -l myZPeak.root
This verifies your grid proxy and data access setup before committing to CI.
Three Approaches: Complete Examples
We show three different approaches to running your analysis in CI. Choose the one that best fits your use case.
Challenge: Create Your Complete Pipeline
Challenge
Choose one of the three approaches above and implement a complete
.gitlab-ci.yml file that:
- Compiles your CMSSW analysis code.
- Obtains authentication (using your chosen method).
- Runs the analysis on the example file.
- Validates the output.
Commit and push to GitLab, then check the CI/CD > Pipelines page to see it run. What happens? Did it succeed?
Congratulations! You have now built a complete, production-ready CI/CD pipeline for CMS analysis using GitLab. You can extend this pattern to multiple datasets, batch processing, and complex workflows.
Content from EXTRA: Building a Container Image in GitLab CI/CD
Last updated on 2025-12-23 | Edit this page
Overview
Questions
- How can I build a container image with my own code in a GitLab CI/CD pipeline?
- How can I reuse the same container building configuration across multiple jobs?
Objectives
- Build and push a container image to the GitLab container registry using buildah.
- Create a reusable
.buildahtemplate for container building. - Use container images built in CI/CD pipelines in your analysis workflows.
Building Container Images with Buildah
Buildah is a container build tool that works well in CI/CD environments without requiring Docker. In this lesson, you’ll learn to build and store container images in the GitLab container registry within your CI/CD pipeline.
What You’ll Need
- A
Dockerfilein your repository that defines your container image. - If unfamiliar with Docker, see the HSF Docker tutorial.
Creating a Reusable Buildah Template
Instead of repeating buildah commands in every job, define a reusable
.buildah template that other jobs can extend:
YAML
.buildah:
  stage: build
  image: quay.io/buildah/stable
  variables:
    DOCKER_FILE_NAME: "Dockerfile"
    REGISTRY_IMAGE_PATH: ${CI_REGISTRY_IMAGE}:latest
    EXTRA_TAGS: ""
  script:
    - echo "$CI_REGISTRY_PASSWORD" | buildah login -u "$CI_REGISTRY_USER" --password-stdin $CI_REGISTRY
    - export BUILDAH_FORMAT=docker
    - export STORAGE_DRIVER=vfs
    - buildah build --storage-driver=${STORAGE_DRIVER} -f ${DOCKER_FILE_NAME} -t ${REGISTRY_IMAGE_PATH}
    - |
      if [ -n "${EXTRA_TAGS}" ]; then
        for tag in ${EXTRA_TAGS}; do
          buildah tag ${REGISTRY_IMAGE_PATH} ${CI_REGISTRY_IMAGE}:${tag}
        done
      fi
    - buildah push --storage-driver=${STORAGE_DRIVER} ${REGISTRY_IMAGE_PATH}
    - |
      if [ -n "${EXTRA_TAGS}" ]; then
        for tag in ${EXTRA_TAGS}; do
          buildah push --storage-driver=${STORAGE_DRIVER} ${CI_REGISTRY_IMAGE}:${tag}
        done
      fi
Template variables:
-
DOCKER_FILE_NAME: Path to your Dockerfile (default:Dockerfile). -
REGISTRY_IMAGE_PATH: Full image path and tag (e.g.,registry.example.com/user/repo:tag). -
EXTRA_TAGS: Space-separated list of additional tags (optional, e.g.,"latest v1.0").
Example 1: Simple Image Build and Push
Extend the .buildah template to build an image tagged
with your commit hash:
YAML
stages:
  - build

build_image:
  extends: .buildah
  variables:
    DOCKER_FILE_NAME: "Dockerfile"
    REGISTRY_IMAGE_PATH: "${CI_REGISTRY_IMAGE}:${CI_COMMIT_SHORT_SHA}"
    EXTRA_TAGS: "latest"
What happens:
- The image is tagged with your commit hash (e.g.,
a1b2c3d). - It’s also tagged as
latestviaEXTRA_TAGS. - Both tags are pushed to your GitLab container registry.
Find your image at Deploy > Container registry in your GitLab project.
Example 2: Conditional Builds with Rules
Build the container image only when the Dockerfile changes or on a schedule:
YAML
stages:
  - build

build_image:
  extends: .buildah
  variables:
    DOCKER_FILE_NAME: "Dockerfile"
    REGISTRY_IMAGE_PATH: "${CI_REGISTRY_IMAGE}:${CI_COMMIT_SHORT_SHA}"
    EXTRA_TAGS: "latest"
  rules:
    - if: $CI_PIPELINE_SOURCE == "schedule"
      variables:
        EXTRA_TAGS: "latest scheduled"
    - if: $CI_PIPELINE_SOURCE == "merge_request_event"
      changes:
        - Dockerfile
    - if: $CI_COMMIT_BRANCH == "main"
      changes:
        - Dockerfile
This ensures containers are only rebuilt when necessary, saving CI/CD time.
Using Your Built Container Image
Once the image is pushed to the registry, use it in subsequent CI jobs or elsewhere:
Locally (on LXPLUS or your machine)
Or with Docker:
Replace ${CI_REGISTRY_IMAGE} with your actual registry
path (e.g., gitlab-registry.cern.ch/username/repo).
Challenge: Build Your Own Container
- Create a simple
Dockerfilein your repository that compilesCMSSWlike the previous example. - Add a
build_imagejob to your.gitlab-ci.ymlthat extends.buildah. - Push your code and check CI/CD > Pipelines to watch the build.
- Find your image in Deploy > Container registry.
- Use it in a downstream CI job or locally with apptainer.
Tip: The commit hash tag (e.g.,
a1b2c3d) ensures a one-to-one correspondence between your
code and the built image, making it easy to reproduce analysis runs from
a specific commit.
Build an image that includes the compiled CMSSW area (from
cmssw_compile)
If you already compile CMSSW in a cmssw_compile job and
publish the full ${CMSSW_RELEASE} as an artifact, you can
bake that compiled area into a reusable runtime image. This lets
downstream jobs (or local users) run cmsRun without
rebuilding.
1) Ensure cmssw_compile exports the area as an
artifact
YAML
variables:
  CMS_PATH: /cvmfs/cms.cern.ch
  CMSSW_RELEASE: CMSSW_10_6_30
  SCRAM_ARCH: slc7_amd64_gcc700

cmssw_compile:
  image: registry.cern.ch/docker.io/cmssw/el7:x86_64
  stage: compile
  tags: [k8s-cvmfs]
  script:
    - set +u && source ${CMS_PATH}/cmsset_default.sh; set -u
    - export SCRAM_ARCH=${SCRAM_ARCH}
    - cmsrel ${CMSSW_RELEASE}
    - cd ${CMSSW_RELEASE}/src && cmsenv
    - mkdir -p AnalysisCode && cp -r $CI_PROJECT_DIR/ZPeakAnalysis AnalysisCode/
    - cd ${CMSSW_RELEASE}/src && scram b -j 4
  artifacts:
    untracked: true
    expire_in: 1 hour
    paths:
      - ${CMSSW_RELEASE}
2) Add a Dockerfile that copies the compiled area
Create Dockerfile in your repository:
DOCKERFILE
# Dockerfile
FROM registry.cern.ch/docker.io/cmssw/el7:x86_64

ARG CMSSW_RELEASE
ENV CMS_PATH=/cvmfs/cms.cern.ch \
    SCRAM_ARCH=slc7_amd64_gcc700 \
    CMSSW_RELEASE=${CMSSW_RELEASE} \
    CMSSW_BASE=/opt/${CMSSW_RELEASE}

# Copy the compiled CMSSW area from the CI workspace (artifact) into the image
COPY ${CMSSW_RELEASE} /opt/${CMSSW_RELEASE}

SHELL ["/bin/bash", "-lc"]
RUN echo 'source ${CMS_PATH}/cmsset_default.sh && cd ${CMSSW_BASE}/src && cmsenv' >> /etc/profile.d/cmssw.sh
WORKDIR /opt/${CMSSW_RELEASE}/src
Notes:
- The
COPY ${CMSSW_RELEASE} ...works because the build job (below) usesneeds: cmssw_compilewithartifacts: true, so the compiled directory is present in the build context. - This image contains your compiled code, so downstream jobs can run
cmsRundirectly.
3) Build the image by extending the reusable .buildah
template
Assuming you already defined the reusable .buildah
template:
YAML
.buildah:
  stage: build
  image: quay.io/buildah/stable
  variables:
    DOCKER_FILE_NAME: "Dockerfile"
    REGISTRY_IMAGE_PATH: ${CI_REGISTRY_IMAGE}:latest
    EXTRA_TAGS: ""
  script:
    - echo "$CI_REGISTRY_PASSWORD" | buildah login -u "$CI_REGISTRY_USER" --password-stdin $CI_REGISTRY
    - export BUILDAH_FORMAT=docker
    - export STORAGE_DRIVER=vfs
    - buildah build --storage-driver=${STORAGE_DRIVER} -f ${DOCKER_FILE_NAME} -t ${REGISTRY_IMAGE_PATH}
    - |
      if [ -n "${EXTRA_TAGS}" ]; then
        for tag in ${EXTRA_TAGS}; do
          buildah tag ${REGISTRY_IMAGE_PATH} ${CI_REGISTRY_IMAGE}:${tag}
        done
      fi
    - buildah push --storage-driver=${STORAGE_DRIVER} ${REGISTRY_IMAGE_PATH}
    - |
      if [ -n "${EXTRA_TAGS}" ]; then
        for tag in ${EXTRA_TAGS}; do
          buildah push --storage-driver=${STORAGE_DRIVER} ${CI_REGISTRY_IMAGE}:${tag}
        done
      fi
Then add the image build job:
YAML
stages: [compile, build]

build_cmssw_image:
  stage: build
  extends: .buildah
  needs:
    - job: cmssw_compile
      artifacts: true
  variables:
    DOCKER_FILE_NAME: "Dockerfile"
    REGISTRY_IMAGE_PATH: "${CI_REGISTRY_IMAGE}:${CI_COMMIT_SHORT_SHA}"
    EXTRA_TAGS: "latest"
    # Optional: pass release as build-arg
    BUILDAH_ARGS: "--build-arg CMSSW_RELEASE=${CMSSW_RELEASE}"
  before_script:
    - echo "$CI_REGISTRY_PASSWORD" | buildah login -u "$CI_REGISTRY_USER" --password-stdin $CI_REGISTRY
    - export BUILDAH_FORMAT=docker
    - export STORAGE_DRIVER=vfs
  script:
    - buildah build --storage-driver=${STORAGE_DRIVER} ${BUILDAH_ARGS} -f ${DOCKER_FILE_NAME} -t ${REGISTRY_IMAGE_PATH}
    - |
      if [ -n "${EXTRA_TAGS}" ]; then
        for tag in ${EXTRA_TAGS}; do
          buildah tag ${REGISTRY_IMAGE_PATH} ${CI_REGISTRY_IMAGE}:${tag}
        done
      fi
    - buildah push --storage-driver=${STORAGE_DRIVER} ${REGISTRY_IMAGE_PATH}
    - |
      if [ -n "${EXTRA_TAGS}" ]; then
        for tag in ${EXTRA_TAGS}; do
          buildah push --storage-driver=${STORAGE_DRIVER} ${CI_REGISTRY_IMAGE}:${tag}
        done
      fi
You can now use the image
${CI_REGISTRY_IMAGE}:${CI_COMMIT_SHORT_SHA} (or
:latest) in later jobs:
YAML
run_with_baked_image:
  stage: test
  image: ${CI_REGISTRY_IMAGE}:${CI_COMMIT_SHORT_SHA}
  tags: [k8s-cvmfs]
  script:
    - source /cvmfs/cms.cern.ch/cmsset_default.sh
    - cd /opt/${CMSSW_RELEASE}/src && cmsenv
    - cmsRun AnalysisCode/ZPeakAnalysis/test/MyZPeak_cfg.py
Tips:
- Artifacts are read-only in downstream jobs, but Buildah only needs
to read them (no extra
chmodis required). - Tag images by commit for exact reproducibility; add
latestfor a moving pointer.