Ecuadorian High Energy Physics Group
A set of quick instructions to get started
Introduction to the basics
If you need a few tutorials/material to start with some basic languages/programs, here there is a (non-complete and ongoing) list of suggested tutorials:
- Git: Carpentry tutorials for the basics of how to use github/gitlab. This is useful to keep your code in a online repository.
- Python: Carpentry tutorial for
pythonand how to create plots using python tools. - Root: THE software used in collider experiments. There are some examples in
C++andpython. - Jupyter Notebook: Jupyter notebooks are the way of creating code from your browser. This is the current standard in industry and it is growing quickly in research.
- Kaggle: the “social network” for data analysts. It is a set of public datasets and jupyter notebooks. Highly recommended.
- Kaggle learn: a set of tutorials in many tools used in data analysis in general. These tutorials are not focused in physics, but for data analyst’s.
- Google colab: your jupyter notebooks in your google account.
Introduction to CMS Physics
CMS has a series of schools with introductory topics for newcomers. A list of the latest schools:
- CMS Induction Course: A set of talks introducing all the main aspects of CMS. From physics, management, detector, etc.
- CMSDAS: CMS Data Analysis School is a set of talks (with videos) focused on the main aspects of data analysis in CMS. Highly recommended. Here one can find examples, with working code, of analysis made at CMS.
Introduction to CERN/CMS Computing basics
Lxplus machine
Certificate
VOMS
Machine Learning (ML) for High Energy Physics
As a first introduction to what CMS is doing with ML, it is strongly recommended to follow the CMSDAS tutorial. Link.
I suggest you to watch the lecture and follow the slides.
As a first step towards getting used to ML tools, I suggest you to use the CMSDAS material in the CERN SWAN. SWAN is a hub created at CERN with many tools needed for CERN data analysis. For more information about SWAN follow this link. Contact me if you dont have access to SWAN.
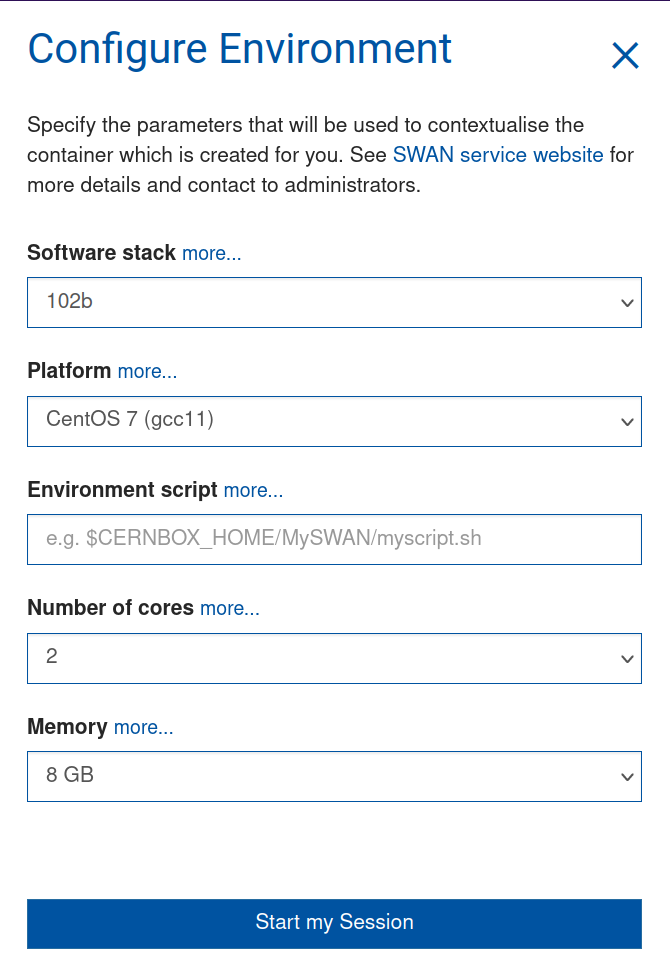
In SWAN you will be asked about the environment you need to create, at this moment you can use the default settings and click on Start my Session.
Once you access your SWAN projects, you can include directly github repositories by click on the button next to the plus button.
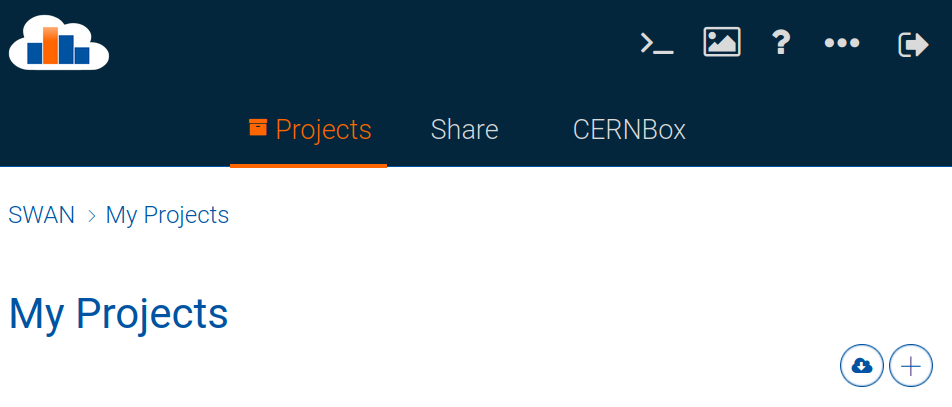
There you can add the github link https://github.com/FNALLPC/machine-learning-das.git from the repository. After this, you will have all the jupiter notebooks in SWAN ready to run. You must start with the 0-setup-libraries.ipynb notebook, which it will create the environment you need for the rest of the notebooks.
Jupyter notebooks are a wonderful tool to teach and to learn coding. However, since you have working code there, it is easy just to run it once and do not understand what the code is doing. I strongly suggest you to take your time to see what the example is doing. Literally play as much as you can with it.
Some known issues
3.1-dense-pytorch.ipynb
This notebook is optional, you can continue to notebook 4 without loosing any major information. If you have a problem with import torch, you need to modify the first cell. From:
!{sys.executable} -m pip install torch torchvision root_pandas --user
to
!{sys.executable} -m pip install torch --user
Then you can run it without problems.
3.2-dense-bayesian-optimization.ipynb
This notebook relies on the skopt package, which is recommended to use with python3. The current environment has python2.7. We can fix this issue, but for now it is not necessary.
4-preprocessing.ipynb
Notebook restarts after running
This only means that you might need to change your environment. Go back to your main SWAN folder and in the top right, click on the three dots. There, find the option change configuration, which it will bring you back to the settings. In my test, it work perfectly with 16 Gb.
Downloading files
In this notebook, you need to access some files that exist only in the CERN storage area. For that you need to set your certificate in lxplus. If you have never installed your certificate in lxplus, please follow this instructions.
Then, in lxplus, run:
voms-proxy-init -rfc -voms cms --valid 168:00
it will print a message containing some information and a line that looks like this:
Created proxy in /tmp/x509up_u99999.
These file contains a certificate that you need to copy to your cernbox. To do that, run:
cp -p /tmp/x509up_u99999 /eos/user/X/USER/tmp/x509up_u15148
where X and USER depends on YOUR user. For instance if your cern user is agomez then X=a and USER=agomez.
Then in the notebook 4-preprocessing.ipynb, in the first cell right after import numpy as np, copy:
##### REMEMBER TO MANUALLY COPY THE PROXY TO YOUR CERNBOX FOLDER AND TO MODIFY THE NEXT LINE
import os
os.environ['X509_USER_PROXY'] = '/eos/home-X/USER/tmp/x509up_u99999'
if os.path.isfile(os.environ['X509_USER_PROXY']): pass
else: print("os.environ['X509_USER_PROXY'] ",os.environ['X509_USER_PROXY'])
os.environ['X509_CERT_DIR'] = '/cvmfs/cms.cern.ch/grid/etc/grid-security/certificates'
os.environ['X509_VOMS_DIR'] = '/cvmfs/cms.cern.ch/grid/etc/grid-security/vomsdir'
where X and USER follows the same notation as before.
Once you properly modify this line, you can run it once because it will download many files needed and it will take a lot of time.
If you have any technical problem, dont hesitate on contacting me on mattermost.
More to come
Useful literature
- Machine Learning Lectures Set of ML lectures with videos at CERN by Michael Kagan (SLAC)
- A high-bias, low-variance introduction to Machine Learning for physicists A good introduction to ML for physicists (with code!).
- CMS ML Group: Website of the ML group at CMS.
- A Living Review of Machine Learning for Particle Physics: THE compilation of papers on ML for High Energy Physics.